I found this on the svrider.com website, and was thinking about trying it myself.
$4 dollar fender eliminator
Date: Tuesday, July 9, 2002
From: Palmers
Supplies:
Hack Saw, tape measure, Electrical Tape, 3' X 1' sheet metal($4) , Tin Snips, flush mounted turn signals ($20)
Intro: If you look at my bike I really like to customize it as much as possible. I wanted to buy a fender eliminator but didn't want the $200 price tag so I decided to do it myself. The project takes about 5 hours to complete but it a lot of fun!
Step 1: Disassembly of the necessary parts.
Take off both seats, which means the side vents come off. Take off the stock turn signals and the license plate and mount. Remove the back plastic body, and finally remove the plastic fender. The entire piece comes off and just rest the battery on the wheel for now.
Step 2: Cutting of the Battery Holder
Now you have to cut off the battery holder but DON'T WORRY, there are bolts on both side so if you want to return the fender to its stock look it will fit with no problem. Use a hack saw and cut right at the line above where the batter top ends on the fender. Bolt the battery back up.
Step 3: Outline of the sheet metal
This is the part that will take the most time. The idea is to make a perfect fit with the sheet metal to the plastic so that the sleek look will be achieved. The width of the piece is going to be 10" at the widest point ( Middle Bolt) but the majority will only be 9 3/4". Start from the battery case and trace the plastic to the sheet metal with a pencil. Take your time and use the tape measure. Don't worry about doing the holes for the bolts yet, that can be done later, all you need is the outline. After you have the complete outline use the tin snips and cut out your piece. The spot where the high mount exhaust connectors touch the sheet metal will act as a temporary holding spot while you make sure everything is lined up.
There are bolts on each side of the frame in the middle, drill holes for those two bolts and also on the rear by the tail light there are two more, drill those two.
That is all the hard part....
Easy part...
Step 4: License plate mount
Take the stock mount and turn it upside down. You want the plate to by smooth against the metal. Mark your two holes for the stock bolts. Drill the two holes and your license plate is mounted.
Step 5: Flush mounted turn signals
Figure where you want the turn signals, doesn't matter exactly where and trace it with a pencil. A really easy way to get the exact hole fit is to take a punch (Used to push nails farther into wood) and trace along the outline of the hole, then take an old screw driver and connect the dots leaving a hold, then take some pliers and you can pull from the back the hole to make the hole a perfect fit, after you have the right side hole use a hammer to flatten the fringes you were pulling with the pliers. Put the signals in and you are almost finished.
Step 6: Finishing touches.
Since the sheet metal is really sharp I lined all the edges with electrical tape so that nothing would get scraped and also it gives a nice outlined look. Tighten everything up and put all the pieces on and everything should be ready for a nice day of everyone telling you how awesome your bike is!!


 Feel free to hang out and lurk as long as you like. However, we would like to encourage you to
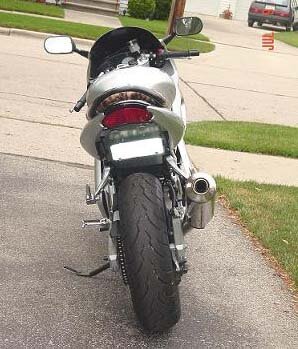
 i'll post up pics of the results