• Welcome to the Two Wheeled Texans community! Feel free to hang out and lurk as long as you like. However, we would like to encourage you to register so that you can join the community and use the numerous features on the site. After registering, don't forget to post up an introduction!

KLR650 Thread

I'm getting ready to install the 685 kit from Eagle Mike and I have a couple of questions for the guys who have done it. 1-Do I need a ring spreader or can I just slide the new rings over the new piston? 2- If I decide to do the MC mod, advancing the timing one tooth, can someone explain how that's done? My bike is tore apart and I'm getting ready to reinstall.

If you have a ring spreader then great, but it's really not needed if you proceed cautiously. Main thing is placement in the correct position and order and you'll be golden.
Advancing the exhaust cam 7.5 degrees forward or one tooth forward allows for thing to happen a bit quicker and you'll be glad you did it.
You'll see two arrows, one one each cam pointing directly forwards hen at tdc, simply loosen the cam at the journals and keep the chain in the same place and turn the exhaust (forward) cam one tooth forward.
Here's the write up link.

http://www.klr650.marknet.us/chaintiming.html
 
I'm getting ready to install the 685 kit from Eagle Mike and I have a couple of questions for the guys who have done it. 1-Do I need a ring spreader or can I just slide the new rings over the new piston? 2- If I decide to do the MC mod, advancing the timing one tooth, can someone explain how that's done? My bike is tore apart and I'm getting ready to reinstall.
GH, I'd love to see this go back together, let me know if I can help?
I've got evenings for the next couple of days, could be your way about 5:00pm or so?

If you have a ring spreader then great, but it's really not needed if you proceed cautiously. Main thing is placement in the correct position and order and you'll be golden.
Advancing the exhaust cam 7.5 degrees forward or one tooth forward allows for thing to happen a bit quicker and you'll be glad you did it.
You'll see two arrows, one one each cam pointing directly forwards hen at tdc, simply loosen the cam at the journals and keep the chain in the same place and turn the exhaust (forward) cam one tooth forward.
Here's the write up link.

http://www.klr650.marknet.us/chaintiming.html

Thanks for all the good support to our KLR community, Scott! :clap: :sun:
 
I ran across this mod on FB, and while it doesn't really interest me, the quality of this part seems to be higher than other cobbled together things I have seen. Description and contact info..

The added length of the modded arm decreases the effort at the clutch lever, reducing fatique and makes the clutch much easier to operate. This mod works on both the new and old generation KLR650's.
Ernie Bell
965 Main Street
Dakota MN 55925
507-643-8888
dakotabeemer@hotmail.com
 

Attachments

  • image.jpg
    image.jpg
    23.8 KB · Views: 204
Hey Mark,
Another set of hands may be helpful, especially getting the cylinder down over the piston. I don't have a garage and I didn't want to do it on my back porch with all the rain we've been having so I rented a storage unit on Hwy 290 next to the new Morellia's. Give me a call on my cell 512-217-2088.

And Scott, thanks for the quick response. You are the Klr man!


GH, I'd love to see this go back together, let me know if I can help?
I've got evenings for the next couple of days, could be your way about 5:00pm or so?


Thanks for all the good support to our KLR community, Scott! :clap: :sun:
 
Anytime, always glad to save someone some money.
I'm off today and tomorrow if you want to come over and get er done. Got a clean shop for your use. Tools and knowledge.
 

Attachments

  • image.jpg
    image.jpg
    29.3 KB · Views: 182
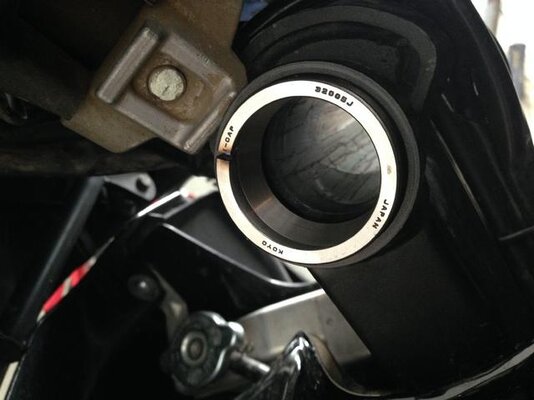
I'll post up these pix for anyone else doing the head bearings.
Take your old race and cut a line through it, then use it to press you new race in and then squeeze it and it comes right out after fully seating your new race.
 

Attachments

  • image.jpg
    image.jpg
    31.1 KB · Views: 182
If you have upgraded your front suspension take your OEM spacer and cut three lines in it, spread the gaps and use it to drive the old race out.
 

Attachments

  • image.jpg
    image.jpg
    17.7 KB · Views: 197
I ran across this mod...The added length of the modded arm decreases the effort at the clutch lever, reducing fatique and makes the clutch much easier to operate. This mod works on both the new and old generation KLR650's.
Ernie Bell
965 Main Street
Dakota MN 55925
507-643-8888
dakotabeemer@hotmail.com

Interesting. I've always thought it was a pain in the *** to shift my KLR compared to my other bikes. Just replaced the clutch cable a couple weeks ago thinking it would help, but no dice. Anyone tried this?
 
Anytime, always glad to save someone some money.
I'm off today and tomorrow if you want to come over and get er done. Got a clean shop for your use. Tools and knowledge.

Thanks, if my bike wasn't already tore down, I would definitely have taken you up on the offer. I could have used a little extra knowledge today. With GG's help, I got the piston, rings, and cylinder installed and then I put on the head and got it all torqued down. Only then did I realize that I had forgotten to put the front cam chain guide back in. Now I have to pull the head back off and those darn acorn nuts. :doh: Totally my bad though. Guess I got in a hurry after getting the cylinder on so nicely.
 
Thanks, if my bike wasn't already tore down, I would definitely have taken you up on the offer. I could have used a little extra knowledge today. With GG's help, I got the piston, rings, and cylinder installed and then I put on the head and got it all torqued down. Only then did I realize that I had forgotten to put the front cam chain guide back in. Now I have to pull the head back off and those darn acorn nuts. :doh: Totally my bad though. Guess I got in a hurry after getting the cylinder on so nicely.

That's a bummer. Make a check list and hopefully you did the MC mod.

Btw; those acorn nuts are easy with one of those craftsman universal wrenches. Only one acorn is tight but I believe the 14mm universal is what does it easier. Hth
 
Last edited:
USPS just delivered my 685 kit today. So, where is everyone going for cylinder boring? I just don't know of any local machine shop (Austin area) that can do this.
 
USPS just delivered my 685 kit today. So, where is everyone going for cylinder boring? I just don't know of any local machine shop (Austin area) that can do this.

Mine was included with a Eagle Mikes 685, and he did my head work. Do you know if you need head work yet?

There is a guy in Pflugerville who does cylinder work. I don't know him or of his work. But I could try to find his number if you want and you can feel him out for what you need.
 
Eagle Mike never answered. So, I bought the kit from Schnitz Racing. They recommend M-Tech for machine work and I've just sent an email. Was hoping to find a closer shop.
 
Thanks to some help and a second set of hands from Gravel Guy, I got the 685 kit installed and the top end buttoned up. MC mod done. Now I just need to put everything back on the bike (Radiator, fan, hoses, etc.) and fire her up. Can't wait! I'll post up the end result. Hopefully it will be a good one.:zen:
 
Thanks to some help and a second set of hands from Gravel Guy, I got the 685 kit installed and the top end buttoned up. MC mod done. Now I just need to put everything back on the bike (Radiator, fan, hoses, etc.) and fire her up. Can't wait! I'll post up the end result. Hopefully it will be a good one.:zen:

Good news, fingers crossed!
 
Interesting. I've always thought it was a pain in the *** to shift my KLR compared to my other bikes. Just replaced the clutch cable a couple weeks ago thinking it would help, but no dice. Anyone tried this?

Patrick, I found this in the FB group "Kawasaki KLR owners" and there may be comments there about its usage.....but I will say, gravity always works and physics is real....so a longer lever should definitely make for an easier clutch pull?! There has been talk lately about going to a hydraulic clutch actuation system....but IMHO that is just adding complication to a great, simple bike...ya know? Good luck and give us a report if you get one! :sun: And when are you coming out to Thorndale for coffee....maybe on a Saturday morning? :sun:
 
Mark,

I ended up pulling the cable and found that it had been routed improperly (I followed the same route the original cable was in when I installed the new cable) and popped in a little more lube and it is a lot smoother now.
Haven't been to Thorndale in years. Last time I was in the area I was up at Louie Mueller! I remember seeing more than a few dirt roads when you got out of the city...might be time to take a trip up there...
 
685 install update: Well I finally got back to being able to work on the bike after Mark and I did the top end. I had a couple of mods I wanted to do while the bike was stripped down, the Klx needle mod and the subframe bolt upgrade. Got both of those done today and then it was time for the moment of truth. I needed to fire this baby up and see if she was happy. I was a little apprehensive after doing the 685 kit and the MC mod, did I do everything correctly and did I get all the parts back in their proper place? Was the timing advanced correctly for the MC mod? I put the battery back in and fuel tank with fresh gas, turned the key....She fired up and purred like a fat happy cat! Woo Hoo! :clap:Let her run for a few minutes to get to normal operating temp, everything sounded good and no leaks, whew. I shut her down and after she cooled, rechecked coolant levels. Then I ran out of daylight, so tomorrow I'll put the plastics, fairings and seat back on and take her for the break in rides. Can't wait.:rider:
 
685 install update: Well I finally got back to being able to work on the bike after Mark and I did the top end. I had a couple of mods I wanted to do while the bike was stripped down, the Klx needle mod and the subframe bolt upgrade. Got both of those done today and then it was time for the moment of truth. I needed to fire this baby up and see if she was happy. I was a little apprehensive after doing the 685 kit and the MC mod, did I do everything correctly and did I get all the parts back in their proper place? Was the timing advanced correctly for the MC mod? I put the battery back in and fuel tank with fresh gas, turned the key....She fired up and purred like a fat happy cat! Woo Hoo! :clap:Let her run for a few minutes to get to normal operating temp, everything sounded good and no leaks, whew. I shut her down and after she cooled, rechecked coolant levels. Then I ran out of daylight, so tomorrow I'll put the plastics, fairings and seat back on and take her for the break in rides. Can't wait.:rider:
Double WOOHOO!! :clap: :rider: :sun:
 
Great job, Marcus and Mark. Marcus this is clay. Marks been coaching me on a fork rebuild on my Super Sherpa. He is a handy friend. Hope to see you at the plant store soon.
 
Great job, Marcus and Mark. Marcus this is clay. Marks been coaching me on a fork rebuild on my Super Sherpa. He is a handy friend. Hope to see you at the plant store soon.

Hey Clay, good luck with the fork rebuild. You're in good hands with Mark. Come on by the nursery, we're gearing up for Spring! If I'm not there, it means I'm out riding!:trust:
 
685 shakedown ride today and thoughts. I posted on another thread that I couldn't make the Hico Pie Run because the clutch cable was fried on my klr. I discovered this during my 2nd break in ride per EM's instructions after installing the 685 kit. Well, my new clutch cable came in and I got it installed today and took the bike out for a post break in shakedown ride. Here are my thoughts on the mods I did (with some help from a friend, GG). The 685 kit was installed because my 2008 was an oil burner and I was getting tired of putting oil in all the time. The bike ran pretty good and had decent power before the upgrade. Mileage was 21,475. I checked the valves when I had everything apart (my first valve check on this bike) and discovered that they were out of spec and kinda tight. Could explain why it was getting harder to start. I ordered new shims and installed them when the top end was put back on. The hardest part of the 685 kit was installing the new circlips on the new piston. I finally figured that out and got them on. I would highly recommend doing the install with a friend. Another set of hands is very helpful when putting the cylinder back on over the new larger piston. The instructions from EM are very good and there is also a pictorial instructions on the Schnitz racing website. I also installed the Klx needle kit from EM and performed the MC mod.(advanced the exhaust timing by one tooth.) The shakedown ride: I went on a 50 mile very fun ride through the backroads around Elgin today and put her through the paces. (The break in rides having already been done.) The bike is running great, better than ever. I didn't notice an extreme difference in power, but I haven't ridden this bike in a while and have gotten somewhat spoiled by the instant power of the ktm 525, so I was thinking I needed to get an unbiased opinion. (Mark?) Still, I mainly did this upgrade to take care of the oil burning issue so I was fine with that. I will say that further into the ride, my impression was that the bike was more responsive than before, especially 3rd gear acceleration, apparently, that was the sweet spot. The other cool thing is that I got to tear down a motor and put it back together and it actually works better than before! I think that's awesome!:lol2:So, bottom line, I'm glad I did this upgrade and though it's too soon to know if the oil burning issue is solved, I'm very happy with the results.
 
Jeez, I have 39k on my 2000 and it don't burn a drop, runs like a top. It starts to wear, I'll probably trade it, sell it, get rid of it and get something else. Good ol' horse at the moment, don't ride it much, should last a lot longer. Heck, I rode it to Columbus to get it inspected and renew the tag last week, first "road trip" I've been on with it in forever. :rofl: It mostly rides in the woods, sometimes with a bag of corn on the rack. It's my street legal ATV. :lol2:

Biggest thing it needs now is a new seat cover. The original is ripped. Oh, and it could use a bath, but that's always the case. Why knock the dirt off and expose the faded plastic? :rofl:
 
Last edited:
Back
Top