• Welcome to the Two Wheeled Texans community! Feel free to hang out and lurk as long as you like. However, we would like to encourage you to register so that you can join the community and use the numerous features on the site. After registering, don't forget to post up an introduction!

cost effective mods i have made

superj

0
Joined
Mar 29, 2014
Messages
27
Reaction score
0
Location
new orleans
Lets put these in order with easiest first.

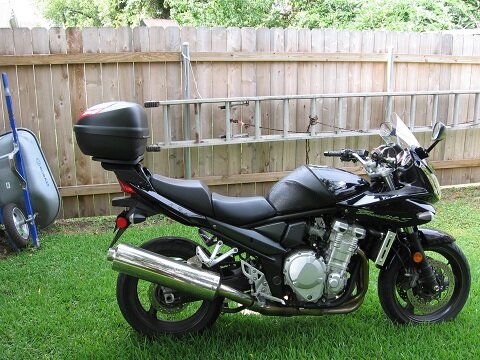
1. Mirror extenders. These are 1" delrin $20 off e bay.

2. Loud horn. I went super budget on this one. Harbor freight dual snail trumpet horns for $10. These are mounted inside the side fairings (1250s model) at the rear. Very tight fit but they are so light that simple homemade steel straps hold them in place. they are ran off a radioshack relay and are pretty loud.

3. HID headlights. 35watt 5000k upper and lower, from DDM. I know these are considered by many to be cheap Chinese junk but after 2 years no problems at all. I wanted to go with 55watt size but was afraid of excessive heat melting the housing. Anyway, these are much brighter than stock. Almost as bright as those in my car.
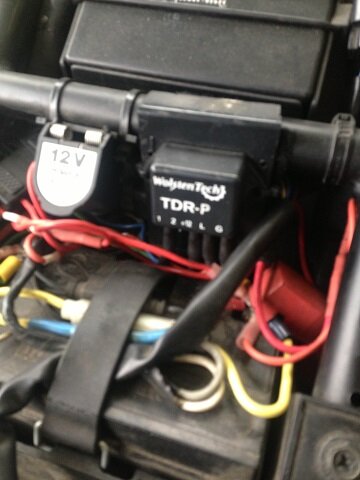
Like the horn, these are on relays. The daytime running light relay being triggered by the right front marker light.. In addition, it is a delay relay. This relay allows for adjustable delay for turn on and off. This way I have time (20 sec) to start motor before light is lit. Also, I set the "off" delay to 60 sec to give me illuminated time to deal with the bike at night.

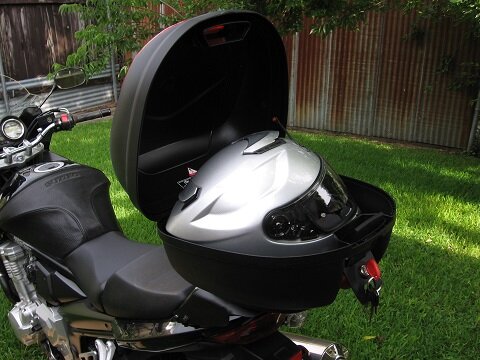
4. Rear rack. The commercially available racks are too rich for me so I made my own. On the twistedthrottle website there is a rack by sw-motech which was my model.
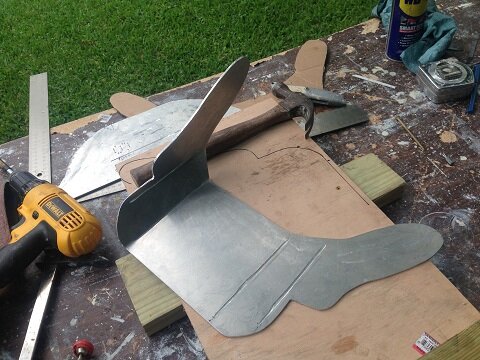
I purchased online 1/8'x12"x24" grade 3003 (I think). Cost about $18 + $20 shipping.
After making a paper template, I cut the aluminum with a jigsaw and lots of wd40. Then beltsand everything straight and smooth, scored metal with circular saw on bend lines, and bent it using my homemade, built just for the job, wooden brake. Hint, this step takes a lot more muscle than brains, 1/8 aluminum is very strong.
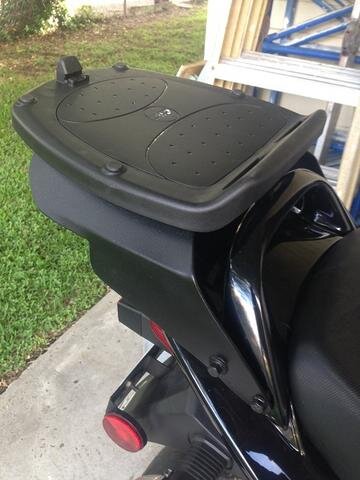
Then line it up, mark and drill mounting holes. I left stock handle in place, so my unit fits over. Stock bolts were too short, so longer bolts and some spacers were needed. Picture shows givi mounting bracket for 30 liter top case. Finish is satin rattle can black. As most of it is covered by the mounting bracket it looks fine.

5. See other post "race tech gold valve". In the interest of budget cutting, I might suggest changing only the stock front springs for race tech units, and forget the gold valves. This would greatly simplify install and save 50% cost. Probably almost as good.

see next post for pictures
 
Delay relay, metal forming, finished product
 

Attachments

  • image.jpg
    image.jpg
    44.4 KB · Views: 215
Here is wollentech delay relay. sorry for the double pic
 

Attachments

  • i phone 2 005resize qqq.jpg
    i phone 2 005resize qqq.jpg
    76 KB · Views: 190
Nice fab on the rack, but is there any particular reason why you made the top of the rack so high, as the higher you mount the top box the more top heavy it's going to make the bike.
 
Thanks for your interest, I initially wanted to still be able to curl my fingers around the handle for when I pull the bike on its center stand, so I left a little room. In practice, that turned out to be not necessary, as the rack is strong enough to use as a handle.
It could be lowered and moved forward by about 1/2" or so. I just need to re drill mounting holes and trim metal, or start again.
 
5. See other post "race tech gold valve". In the interest of budget cutting, I might suggest changing only the stock front springs for race tech units, and forget the gold valves. This would greatly simplify install and save 50% cost. Probably almost as good.

see next post for pictures

I did this and I'm pretty happy with the result. I didn't have the cash to pay someone else to do it, and I wasn't confident enough that I could revalve the forks myself. I decided it couldn't hurt, so did the springs only (easy job). Changing to race tech springs with the correct spring rate still made a big difference in the handling/ride quality.

If/when I find some extra money I may get the forks revalved too, but for now I'm pretty happy.

Same here, when I got the Bandit last fall I didn't have allot of time to work on it before winter set in (tundra). I ordered 1.1kg. race tech springs and sucked 8 oz. of fork oil out of each tube and replaced it with 5 wt. Bel Ray (stock is 10 wt.).
The 1250 only had 2400 miles on it so I was not too concerned about sludge in the bottom.

With the stock set up being under sprung and over damped this made a significant change in the handling without much cost or down time. Fork Brace is next. Possibly a shock.
 
How well does it carry?

Haven't tested it loaded yet. Too hot to ride much down here, and do any real testing. With the box empty, didn't even notice it. Had to keep looking back to make sure it was still there.

Looking at the pictures shown here it does look a little high. The only way to really lower it would be to remove the factory handle and re drill the mounting holes. There is 1 1/2" vertical distance now between the rack and the bike tailpiece, which could be reduced to 1/2" I guess. Also, without then handle in the way, it could also be moved forward.

The top box is a 30 liter monolock givi , and is just big enough for 1 large full face helmet.
 

Attachments

  • july 2014 070 resize.jpg
    july 2014 070 resize.jpg
    120.3 KB · Views: 195
  • july 2014 072 resize.jpg
    july 2014 072 resize.jpg
    91.1 KB · Views: 172
Just finally had a crack show up on my Aluminum rack that's had soft luggage, cooscase and givi mono lock cases on it for the last about 75,000 miles corrected for speedo healer. So , decided to just take it all off and run a soft tail bag on the rear seat. Had a passenger on the rear for about 300 miles in the life of the bike so may as well use the seat for something since my long distance touring days are over with due to da body finally saying Uncle.
 
Just finally had a crack show up on my Aluminum rack that's had soft luggage, cooscase and givi mono lock cases on it for the last about 75,000 miles corrected for speedo healer. So , decided to just take it all off and run a soft tail bag on the rear seat. Had a passenger on the rear for about 300 miles in the life of the bike so may as well use the seat for something since my long distance touring days are over with due to da body finally saying Uncle.

I have a rear seat pack on my 1200, and it makes travel so nice, light weight and easy on and off. Like you my trips have decreased in time and mileage, but I so enjoyed a 600 mi trip through northern NM spanning a couple days of good scenery and roads with many curves.
Achesley: How far can you ride per day now since your accident?

Smoky:rider:
 
Achesley: How far can you ride per day now since your accident?

Smoky:rider:

Getting back up to about 230 miles on the Bandit and about 125 or so on the KLR. Difference is the type roads I'm running between the two.
Went to a few combos on travel luggage starting with just a tank bag , then added a tailpack, then a soft luggage set up then PLX Givi set up. Which I will probably put up for sale shortly. Now back to tail pack and tankbag. LOL Big circle.
 
The different set ups.

Playing about in Arkansas in '08
BanditinAk.jpg

Playing about in Arkansas in 'o9
PICT0020.jpg

New Mexico/Colorado trip in '09
01NewMexSceneryjpg.jpg


Another out West trip in '10
PICT0014-2.jpg


Montana and points West in '12.
IMG_0911-1_1280_x_1024.jpg


Started with and back to this set up.
Bandit03252014.jpg
 
well I just, today, installed a new sargent seat. to the touch it felt firmer than oem and I was concerned it wasn't going to work for me. after a short around town ride I think it will work out well. wider support on the butt seems to make the difference, but haven't really tested it. now perhaps I'll need risers and there doesn't seem to be any play in the cables. does one mod lead to another? :-P got the seat off ebay for a good price. looked at the holeshot/corbin seat but it was almost $500. :rider:
 
I'll need risers and there doesn't seem to be any play in the cables. does one mod lead to another?

I'm not sure about the ABS models but on the standard ( my '07 ) I was able to go to 1.5 inches up and back without problems. At 3 inches I had to redo the brake lines and re route the hoses and wires. Not a problem though.
 
I used cheap ebay ones like the one below but NOT chrome. 1 inch up and my minor wrist pain went away. Nice thing is you can sit comfy or get on the front a bit for sportier feel/corners, etc! ;) Cheap and effective anymore rise I think will take away from the sporty ness of the bike!

http://www.ebay.com/itm/1-Handlebar-Risers-Suzuki-DL650-DL1000-VStrom-/170640530088?pt=Motorcycles_Parts_Accessories&hash=item27baf7daa8&vxp=mtr

PS: I also have the DDM hids and after about 3 years and 25kish the ballast went out not bad for "Chinese junk"! ;)
 
Back
Top