• Welcome to the Two Wheeled Texans community! Feel free to hang out and lurk as long as you like. However, we would like to encourage you to register so that you can join the community and use the numerous features on the site. After registering, don't forget to post up an introduction!

Sealing an unused wire end; a better way

E.Marquez

0
Forum Supporter
Joined
Jan 2, 2006
Messages
3,852
Reaction score
67
Location
Kempner, TX
First Name
Erik
We modify our bikes, its what we do.
Sometimes we remove a safety switch, a light, or another part that leaves you with an unused and now open unsealed wire end or plug.
Or we swap an OEM part that used 3 wires to power and control it, but the after market one only uses 2.
What ever the reason, we sometimes end up with what is now an extraneous wire, bullet connector or terminal.
Those left over wires or terminals can cause a short to ground if not covered, they can lead to corrosion as it starts at open and unprotected terminal crimped to the wire and worms its way into the wiring harness.

Snipping that unused left over wire and covering with a wrap of electrical tape is a time honored method and it works, until it doesn't. The tape comes loose after a summer of riding, water gets in when you play in the mud, cross a creek, wash the bike and starts corrosion or worse, the hot wire end grounds out and you have a blown fuse or damaged electrical component.

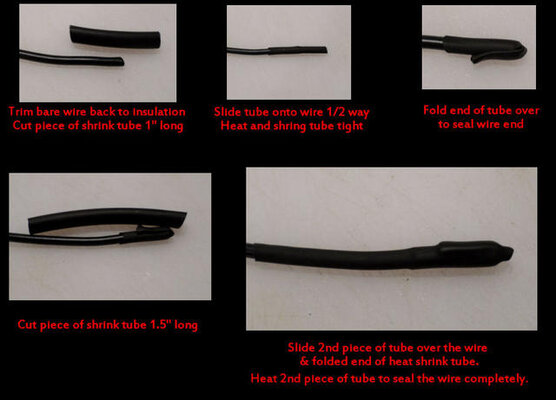
Here is a better way to seal off that unused wire end.
It takes two pieces of heat shrink tubing (or three if binding together more then one sealed wire)

attachment.jpg


I prefer to use double wall adhesive lined heat shrink tubing for the job.. I use 3M Adhesive-Lined Polyolefin Heat Shrink Tubing and 3M non lined Polyolefin Heat Shrink Tubing, but many other brands are out there as well. Do a Google search for "heat shrink tubing" and "adhesive lined heat shrink tubing" then pick what you want in the size and color.Look at the shrink ratios and starting size to understand what size it will end up.
Regular heat shrink tube does a ok job as well for sealing an unused wire end, just not quite as weatherproof...Suggest you always use the dielectric silicon on wire tip in step one is not using adhesive lined tubing.


Consider buying just a little more then needed for the job at hand and soon enough you'll have a collection that gives you the proper size tubing most every time.
attachment.jpg


If you are planning on that sealed wire being often submerged in water or mud, you can coat the very end of the wire wire in the first step with dielectric silicone to further help water proof the open end of the wire.

If you have more then one wire left over, you can slip a third piece of tubing over the wires and shrink down to create a niece secure, protected bundle that loose clean. Like this
attachment.jpg


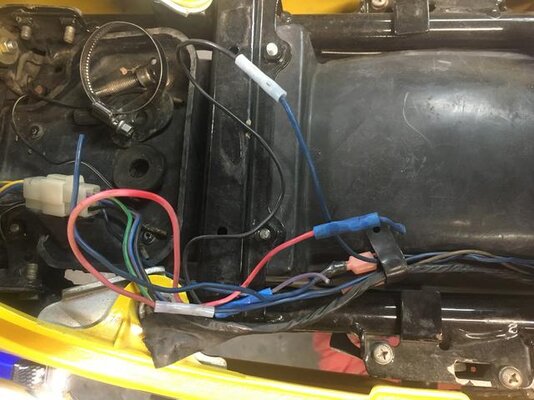
For this particular task I was asked to keep the associated plug in place and terminate the unused wires after the plug. This gives the owner several options... If desired later at time of resale, or change of mind, a simple job of re-soldering the cut off switch and its wires returns the wiring harness and bike to "stock".
Also in this case that plug and its circuit is a key on hot 12v power and ground source the owner can use to power (though a fuse please) a low wattage add on device, like USB charge port, GPS, ect. and it has a nice modern sealed plug to disconnect that added mod as needed.
 

Attachments

  • sealing a wire.jpg
    sealing a wire.jpg
    37.9 KB · Views: 1,381
  • Heat shrink tubing.jpg
    Heat shrink tubing.jpg
    39 KB · Views: 1,518
  • IMG_7992.JPG
    IMG_7992.JPG
    55.1 KB · Views: 1,539
I specialize in electrical. I'm no longer amazed at the different Mickey Mouse ways I see people make electrical repairs. I always try to make everything look "factory", neat and tidy. I solder all my connections, use heat shrink and dielectric grease. This is a bit of fresh air to see someone else make such quality repairs.
 
I specialize in electrical. I'm no longer amazed at the different Mickey Mouse ways I see people make electrical repairs. I always try to make everything look "factory", neat and tidy. I solder all my connections, use heat shrink and dielectric grease. This is a bit of fresh air to see someone else make such quality repairs.

Why thank you, I never thought it was much harder to do right then just do.. I think a lot of shoddy work is, the worker just does not know a better way or that the way they did it is not ideal.

This is just powersport terminals and connectors
attachment.jpg


I've got 5 like sized boxs with automotive stuff and a tool cart just for crimper's, cutters & soldiering stuff.

Scotch locks may come in on a bike but they leave in a trashcan :giveup:
 

Attachments

  • connectors.jpg
    connectors.jpg
    32 KB · Views: 1,493
I have done part 1 (cut wire, put on shrink wrap, heat and pinch closed), but I have never folded it over and done step 2. Interesting way to seal it up watertight.
I don't think I have ever left an unconnected wire in an exterior location, so never thought of it, but will use it if I ever do.

I have gotten better and actually sealing and connecting wires. I admit I used quick splice and crimp connectors in the past, but am slowly buying the correct stuff.
Its a learned thing most figure out after fixing past less good jobs of their own or others
I get this stuff every week to fix

attachment.jpg


attachment.jpg


attachment.jpg


Wire nuts come loose, open crimp splices that get corroded and have conductors break do to no stress relief
 

Attachments

  • IMG_8064.jpg
    IMG_8064.jpg
    48.6 KB · Views: 1,055
  • IMG_8066.jpg
    IMG_8066.jpg
    29.1 KB · Views: 1,408
  • IMG_8065.jpg
    IMG_8065.jpg
    29 KB · Views: 1,410
I've used crimp connectors on 14-18 and squeeze a little white silicone in ends. Like stated wire nuts are asking for trouble. Shrink tube is probably better but a pain for me.
On the pictured blue inline connectors I would say they used the wrong crimp and pierced or nearly pierced the plastic insulator, although it will still work
 
Last edited:
Good post. I have definitely been guilty of the quick wrap with electrical tape to be tucked away and forgotten about.

Where do you guys source quality electrical components for our bikes? Stuff like good connectors, terminals, wiring, switches, in line fuses etc. Stuff I can find at auto stores, hardware stores online even boat stores seems to all be same cheap junk.
 
Where do you guys source quality electrical components for our bikes? Stuff like good connectors, terminals, wiring, switches, in line fuses etc. Stuff I can find at auto stores, hardware stores online even boat stores seems to all be same cheap junk.

This! Please do share.
 
Erik, thanks for posting tips.

And...

Oh my gah, I apologize to all people owning items after me from my younger days - items that I've done electrical work to. I'm going through this bike now, and I'm repairing the previous owner's mess. I'm about to lose my mind. I'm TIRED of fixing electrical wires.

Now that I've finally gotten a little smarter and better about electrical work...
I like the weatherpack-type connectors in certain areas. But I'm really using the heck out of OEM bullet connectors for general connections. Got to buy new crimpers (IWISS) and auto-strippers (IRWIN VISE-GRIP 2078300 from Lowes) too (yay tools!). I'm utilizing liquid electrical tap too, which is a neat thing. As well as dielectric silicone grease.

As for suppliers..
http://www.cycleterminal.com/bullet-terminals.html has some good stuff.
I bought some stuff from amazon though, same items.

And http://kojaycat.co.uk/epages/950000457.sf/en_GB/?ObjectPath=/Shops/950000457/Categories has good How Tos
 
Last edited:
..always use the dielectric silicon on wire tip

I'll see your dielectric grease, and raise you a dob of Gorilla Glue. :sun:

A drop of that foaming glue goes on before heat-shrinking with a candle. A candle provides more control than a Bic lighter, but costs less than a heat gun.

I steal candles from my wife, so they are somewhat free. Somewhat.

I employ this method on my fishing boat where the wires are often under-water during rough seas.

Cheapest heat-shrink I have found are these 8-foot rolls from Lowes. Not 3M good, but pretty good.
 
Good post. I have definitely been guilty of the quick wrap with electrical tape to be tucked away and forgotten about.

Where do you guys source quality electrical components for our bikes? Stuff like good connectors, terminals, wiring, switches, in line fuses etc. Stuff I can find at auto stores, hardware stores online even boat stores seems to all be same cheap junk.

I buy a lot from two sources
Cycle Terminal http://www.cycleterminal.com/index.html
and Corsa Technic https://www.corsa-technic.com

Heat shrink tubing I get from Amazon mostly

Occasionally Eastern Beaver has something i want not otherwise available https://easternbeaver.com
6-7 years ago I bought a lot more from him, but now that there are US sources for most all he sells its not needed.

For Add on circuits I HIGHLY recommended the FZ-1 Fuse Box from FUSEBLOCKS http://www.fuzeblocks.com

USB ports I get from Blue Sea https://www.bluesea.com/products/1016/Dual_USB_Charger_Socket
SAE port I use OptiMATE https://www.amazon.com/dp/B0031BOTFC/?tag=twowhetex-20

LED voltage monitor I get from Roadster Cycle

http://roadstercycle.com/Motorcycle voltage monitor.htm

Really like the lever perch mounted switches from Highway Dirt Bikes https://www.highwaydirtbikes.com


And I could go on for hours...lol but that would get boring for you you and tiring for me...
I've been doing this for a long time now..I have a source for a lot of electrical things you can add to a bike..Some of that is THE source, and some of it is personal preference source.

If you have a specific component your looking for, ask.
 
highwaydirtikes -- I found that site the other day. I could spend $$ there
 
Oh great, now my Trail Tech NEEDS a dash. Thanks Erik!:roll::lol2:
 
I'll see your dielectric grease, and raise you a dob of Gorilla Glue. :sun:

I like the idea :thumb:

According to the GG tech page, the glue is neither recommended for gap filling nor is it flexible and should not be used on flexible item repairs.
That said, I use Anaerobic thread lock in "unapproved " applications and it works well. :giveup:
 
Good info. You'd cringe if you saw all the wire nuts hidden under my plastic. :duck:
 
Bad wiring is one of my biggest pet peeves. Like you I have boxes of OEM connectors.
 
Where are y'all getting small LED dash lights, and switches? Currently I'm using Oznium.com and eBay.

And thanks for the other sources, I really need to get kitted out with better elec tools.
 
https://www.superbrightleds.com

Switches, just depends on what style, wattage, ect..
Highway Dirt bikes has some neat products though Ive been using lately.
https://www.highwaydirtbikes.com

I'll second superbright leds.
For the really hard stuff to find that's not necessarily vehicle specific, like switches, connectors, etc., I like Mouser and Digi-Key. You have to have a pretty good idea as to exactly what you want, but if it's a high quality electronic component, they probably have it and they'll probably be much cheaper than other places.

https://www.mouser.com/?gclid=CjwKC...sj-FnqbDKvDqSUag9JEtZC-7MWYYB4MRoCofMQAvD_BwE

https://www.digikey.com/?&utm_adgroup=General&gclid=CjwKCAiA_ojVBRAlEiwAOLRxIwpRSYzVo_eXvNj_aMD-bdLJZT8SJ5CeExh3M1ptHWXxLpr8QyDexhoCmcYQAvD_BwE
 
If it's electrical, I guarantee that Mouser has it. If you can find the specific item you are looking for among the tens of thousands of products they carry, you are doing better than I am. Their catalogue is huge.
 
Erik, sorry to skip back to an old post I’m looking at ordering the fz1 fuse box after your recommendation. Do you suggest I purchase the wiring kit with it? Does the block itself come with the leads to the battery?

The FZ1 fuse block does not come with any wiring.
12ga power leads and 22-16 gauge trigger wire is supplied by installer.

I personally would not buy a kit, but I have lots of supplies on hand and i find most "kits" are at best only somewhat useful
 
Do you suggest I purchase the wiring kit with it? Does the block itself come with the leads to the battery?
Morning, I had a second thought on your wiring question. I realized I answered for me.. But I have lots of supplies on hand, many wiring tools at hand and have spent a lot of time using them.....
I don't know what you have.

so that said....the answer to should you buy their $35 or $45 wiring Kit is, it depends.

What it gets you is some material ..but at $35 you can buy everything you needs and have left overs for other projects..If that day will never come, than maybe buy the kit.

The kit gets you three pre terminated on one end wire runs, two of them with a fuse holder. .. Can you solder and use heat shrink tubing? If you can and Your wiling to spend the time again Id say do that and not buy the kit.....
BUT if you find you have less time then money, or just don't like the work, buy the kit.

If its an experience thing, don't let it be, between help here and what you can find on line the job is not hard, and the best part, you learn though doing but mistakes are really cheap to fix...
Bad crimp, do it again your out $0.03
Bad solder joint? Snip off 1/4" strip wire and do it again.

The Kit suggest the use of wire taps, as those go I'm not a big fan....anything that pierces the wire insulation, anything that is a snap or screw together device is not my preferred method.
That said, if I had to use a tap, it would be a posi tap...
When I install a FZ1, as they almost always go under the seat near the rear of the bike, I connect the relay trigger terminal to a taillight 12v key on wire. I do that by removing that terminal pin from the housing and soldiering my trigger wire to that pin, slide some heat shrink tube onto both wires and shrink as a stress guard and then inserting it back into the housing. On the rare occasion that wont work doe to connector design, I will release the pin from the housing, cut back some insulation, solder the trigger wire on and again use a piece of heat shrink tube to seal and stress relieve the joint....
The same thing in a slightly less clean way can be done without releasing the pin from the housing.... carefully remove some insolation and then lay trigger wire along side the primary wire, and coil wrap the trigger wire around it, soldier and use liquid electrical tape to seal. I would also use a few small zip ties at the joint and a few CM back to reinforce the wire joint.
 
Last edited:
Back
Top