• Welcome to the Two Wheeled Texans community! Feel free to hang out and lurk as long as you like. However, we would like to encourage you to register so that you can join the community and use the numerous features on the site. After registering, don't forget to post up an introduction!

Trying my hand at some moto metal art

Joined
Jan 10, 2008
Messages
538
Reaction score
445
Location
Plano
First Name
Leif
A while ago I received a mostly complete BMW F800GS engine from Goyko. This is still a work in progress and I am going to change it up a little bit. I think I will go with a nicer socket and do just a cool Edison bulb on top instead of doing a shade. I'm also going to make it electrostatic so that you can turn it off and on by touching any metal part on it. :)

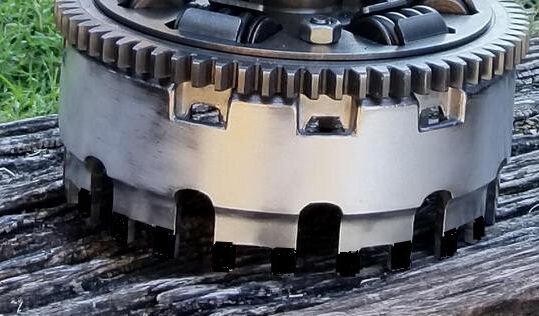
I'm still on the fence for doing a base for it. I kind of like it how it sits but that base could be rough on whatever it sits on. I'm going to try some felt and if that doesn't work.... I'll be either mounting it to an aluminum plate with aluminum feet or go with some weather wood (got that idea from this picture).

36310598496_e2b4b69324_k.jpg
20170730_184415 by Leif Price, on Flickr
 
Very nice!! The trick will be picking out the right lamp shade. ;)
 
Very nice.

If the shade is to be a rustic brown, tan or the like,, a wood base turned on a lathe would match well.
Otherwise perhaps feet, or a aluminum disc
 
4 cylinder?
Whats it for? The baby's room?

:-P :-) ;-)

Very nice work ...
 
4 cylinder?
Whats it for? The baby's room?

:-P :-) ;-)

Very nice work ...


Two cylinder, note the Briggs and Stratton design balancer.
The tricky part will be running the power cord through the crank.
 
put a solar panel on top and switch it to bulb or a small windmill generator to power bulb and charge battery or both.
Really neat work
 
I really like the sprocket idea for a base!!! Thanks for the idea Retiredtoosoon!!! Now I just need to find a used one. I'm really regretting all the parts I have tossed over the years. :pound:

As for wiring... You can see it in the picture but you have to really look for it but there is a metal tube welded to the backside. I have the top and bottom ends drilled but no the center. If you look closely behind and left of the stamped 9630 you can see a drilled hole. Same thing up top. The only wire that will be visible will be from those holes to the backside.

I think I'm going to run with a nicer brushed nickel socket and a cool Edison bulb.
47729SN.jpg


The nice thing about this build is that I can reconfigure the top part to my liking. Nothing is permanent on the light fixture at this point. :)
 
I really like the sprocket idea for a base!!! )

Sprocket will still be a bit rough on the surface the lamp sits on. If you were to spray the bottom side of the sprocket with bed liner material you would have a non slip , non marring "cushioned" surface to sit on a glass, wood, or any other surface.

In fact, I bet you could tape off the clutch hub, except for the lower edge of the fingers and spray or paint on that same bed coating and it wold give you a way to protect the table and as well as make it non slip.

I might tape off all but the bottom and lower .50" of the finger and then paint or spray on... you would end up with a nice black contrasting "ring" as the bottom.

Something like this (pardon my crude art)

attachment.php
 

Attachments

  • like this.jpg
    like this.jpg
    52.8 KB · Views: 382
Last edited:
Sprocket will still be a bit rough on the surface the lamp sits on. If you were to spray the bottom side of the sprocket with bed liner material you would have a non slip , non marring "cushioned" surface to sit on a glass, wood, or any other surface.

In fact, I bet you could tape off the clutch hub, except for the lower edge of the fingers and spray or paint on that same bed coating and it wold give you a way to protect the table and as well as make it non slip.

I might tape off all but the bottom and lower .25" of the finger and then paint or spray on... you would end up with a nice black contrasting "ring" as the bottom.

Or better yet.... black plastidip the lower part of the fingers. Thanks for the great idea!!!:thumb:
 
Ya gotta hide the 110v power cord.... do that and every designer will buy 6 of them.
I like it.
 
Dude that's awesome! I kind of want one now


Sent from my iPhone using Tapatalk
 
Hmmm? You only need a big enough hole for a single conductor. The metal body can handle the neutral side. A few holes drilled and the single conductor will pretty easily disappear.
 
Or better yet.... black plastidip the lower part of the fingers. Thanks for the great idea!!!:thumb:

Great idea, much easier to apply cleanly :giveup:

Plastic Dip is liquid self curing latex.. It will be easier to apply for sure and not a bad idea..clean, simple.. It is not as durable as bed liner though.... so as the years (or lamp moves) go up you may want to check lower finger covering for wear and steel peaking though.
 
Finally finished it. It's setup where you can roll naked with an Edison bulb or clip in the shade holder and roll with a shade. The Plasti-dip worked out great for coating the clutch finger baskets so that the piece doesn't tear up what you set it on.

36255788223_64fe7775fc_k.jpg
20170905_170707[1] by Leif Price, on Flickr
 
Excellent work, I may have to try my hand as soon as I have some DR-Z parts to weld on...
 
Very nice. I want one now all I need is a free engine and the skill to make one.
 
The cross is awesome. Good work

Sent from my Moto G (4) using Tapatalk
 
Back
Top