


 Feel free to hang out and lurk as long as you like. However, we would like to encourage you to
 - Joined
- Feb 28, 2003
- Messages
- 51,225
- Reaction score
- 8,207
- Location
- Huntsville
- First Name
- Scott
- Last Name
- Friday
Howdy,
Yes, I know there are some people that think the stock GS seat is fine. My butt would beg to differ. So after 20K miles of never getting around to it, I finally broke down and decided to use the foam that has been sitting in my garage for the last year or so. It was intended for another GS... Debbie's zook GS500. She decided she liked her stock seat so I inherited some nice memory foam and some other firm foam. I pulled a staple out of the GS seat and headed to Home Depot to get me a staple gun and the right sized staples. Back home, I pulled the rest of the staples.
The cover comes off the foam with some gentle prying. It is glued to the foam with contact glue. I just went slow and tried not to tear the foam. When I finished, it looked like some kind of strange sponge cake.

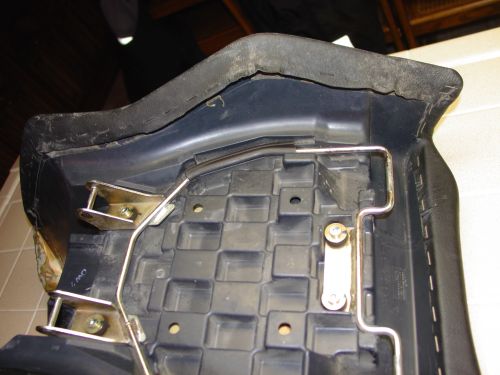
The foam is also glued to the seat pan. I slowly worked my way around the edges peeling gently until everything came off. What I found was a bit disappointing. I can't believe where the BMW twits put the bolts for the mounting bracket. They are right where my pelvic bones sit, right in the low spot of the saddle shape, no wonder I was hurting so bad The soft stock foam would crush down and I was sitting on these screws!

I ran over to Mom's and swiped her electrical knife. I grabbed a Sharpie and marked out the area that I wanted to remove. This is the area where I will replace the existing foam with the firmer foam that will hold my butt up off those silly screws.

A few minutes later...

For some reason I was sweating when I got done with this. It was cool in the house but I had a giddy nervous sweat going... At this point, there was no going back. Fortunately, when removing the old foam, I had the presence of mind to do it in large chunks instead of lots of tiny pieces. This allowed me to add some foam back where I had removed a tad bit too much.

I used some spray contact cement that bonds like crazy. I got one shot to get something in the right spot, then it was STUCK. This stuff came out of the can like silly string, flying all over the place in a whispy stringy stream of incredibly sticky goo. It was a little breezy outside so I got it all over me. My knuckle hairs were glued together. It was strung from my hat to my jacket, to my gut and all the way down to my freaking boots!! Let me tell you that it hurts when several knuckle hairs get pulled out at one time!
I think the firm foam came from REI or some place similar. I think it is the same stuff that many of the sleeping pads are made of. These sheets were 24" X 24" and two sheets was just enough. Before spraying the goo from ****, I dry fitted the pieces to make sure I could get two layers in place. Then I sprayed goo everywhere...

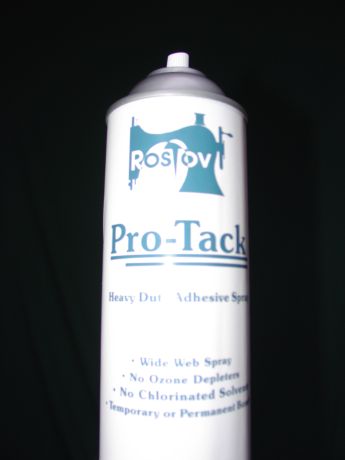
I let the pieces sit for about 10-15 minutes after spraying them, then I CAREFULLY lined everything up and pushed the pieces into place. Here's the goo I used, nothing special and about $7 a can. You could do quite a few seats with one can.
Once the first layer was in place, I used the electric knife to trim things up a little.

Then I added the second layer of the blue foam (each layer is 1/2"), trimmed it up and fitted the seat cover back over everything for a look.
It looked a bit rough and the seat cover did not hide as much of the underlying imperfections in my sculpting as I had hoped. I took it out to the garage and put it on the bike for the butt test. I could feel every lump and bump where I did not get the sculpting perfectly smooth. The problem is that the electric knife is good for rough cutting, but not for fine cutting. It would have been nice to have some kind of belt sander or a hotwire to slice through the foam evenly. In the end, I decided to see if I could fit one 1/2" layer of the soft memory foam over the entire seat to smooth things out and also to give me a tad bit of cushion over the top of the very firm blue foam.
To give the entire seat a more uniform look and to hide the seams where the different areas of foam come together, I decided to cover the entire seat. Once again I embraced the flinging goo. This stuff became like industrial strength boogers on my fingers that wouldn't come off! Anyway, with a little help from Debbie, I slowly laid the final layer down on the seat making sure it is spread evenly so I don't get any weird wrinkles anywhere. I let it dry a bit and then trim it up.

It looked a bit fat so I was concerned the seat cover wouldn't be able to reach everywhere so I could restaple it to the pan. However, this foam is VERY soft and crushes down easily at the edges. I got the cover back over the foam and then started the stretching process. I smoothed from the center out to the edges, making sure it was the same on opposite sides so that I would have the same amount of overlap for stapling on the underside of the pan.
My staple gun sucks. I threw down $10 bucks on a staple gun and I expect it to at least get the staples into the plastic :angryfir: Instead, it puts the staples in about half way, no matter how firmly I try to hold it against the surface. I wind up having to come behind with a flat head screw driver and carefully pushing each and every staple all the way down. My thumbs were killing me from pushing on the shaft of the screw driver. However, when I finally get it done, it looks pretty good. BMW had glued down the edges of the seat cover originally and I thought I was going to do likewise (and may yet), but for now, I am just going to leave it at the staples. I take it out the bike and mount it so I can repeat the butt test. It feels great! It feels a little thicker between the legs, but I like it because it increases the pressure area and thus reduces the load for any given point. I can still easily flat foot the bike, the seat height remaining unchanged.
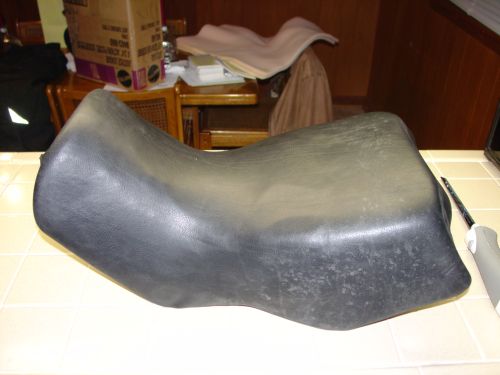
Here's the final product.

I figure it can't be any worse than it was before and I only spent $15 :wink: Of course, I got the foam and glue free, hehe. I think that was about $50 when Debbie originally ordered it. I'll hopefully take it out for a spin tomorrow and will report back how it worked.
Adios,
Yes, I know there are some people that think the stock GS seat is fine. My butt would beg to differ. So after 20K miles of never getting around to it, I finally broke down and decided to use the foam that has been sitting in my garage for the last year or so. It was intended for another GS... Debbie's zook GS500. She decided she liked her stock seat so I inherited some nice memory foam and some other firm foam. I pulled a staple out of the GS seat and headed to Home Depot to get me a staple gun and the right sized staples. Back home, I pulled the rest of the staples.
The cover comes off the foam with some gentle prying. It is glued to the foam with contact glue. I just went slow and tried not to tear the foam. When I finished, it looked like some kind of strange sponge cake.
The foam is also glued to the seat pan. I slowly worked my way around the edges peeling gently until everything came off. What I found was a bit disappointing. I can't believe where the BMW twits put the bolts for the mounting bracket. They are right where my pelvic bones sit, right in the low spot of the saddle shape, no wonder I was hurting so bad
I ran over to Mom's and swiped her electrical knife. I grabbed a Sharpie and marked out the area that I wanted to remove. This is the area where I will replace the existing foam with the firmer foam that will hold my butt up off those silly screws.
A few minutes later...
For some reason I was sweating when I got done with this. It was cool in the house but I had a giddy nervous sweat going... At this point, there was no going back. Fortunately, when removing the old foam, I had the presence of mind to do it in large chunks instead of lots of tiny pieces. This allowed me to add some foam back where I had removed a tad bit too much.
I used some spray contact cement that bonds like crazy. I got one shot to get something in the right spot, then it was STUCK. This stuff came out of the can like silly string, flying all over the place in a whispy stringy stream of incredibly sticky goo. It was a little breezy outside so I got it all over me. My knuckle hairs were glued together. It was strung from my hat to my jacket, to my gut and all the way down to my freaking boots!!
I think the firm foam came from REI or some place similar. I think it is the same stuff that many of the sleeping pads are made of. These sheets were 24" X 24" and two sheets was just enough. Before spraying the goo from ****, I dry fitted the pieces to make sure I could get two layers in place. Then I sprayed goo everywhere...
I let the pieces sit for about 10-15 minutes after spraying them, then I CAREFULLY lined everything up and pushed the pieces into place. Here's the goo I used, nothing special and about $7 a can. You could do quite a few seats with one can.
Once the first layer was in place, I used the electric knife to trim things up a little.
Then I added the second layer of the blue foam (each layer is 1/2"), trimmed it up and fitted the seat cover back over everything for a look.
It looked a bit rough and the seat cover did not hide as much of the underlying imperfections in my sculpting as I had hoped. I took it out to the garage and put it on the bike for the butt test. I could feel every lump and bump where I did not get the sculpting perfectly smooth. The problem is that the electric knife is good for rough cutting, but not for fine cutting. It would have been nice to have some kind of belt sander or a hotwire to slice through the foam evenly. In the end, I decided to see if I could fit one 1/2" layer of the soft memory foam over the entire seat to smooth things out and also to give me a tad bit of cushion over the top of the very firm blue foam.
To give the entire seat a more uniform look and to hide the seams where the different areas of foam come together, I decided to cover the entire seat. Once again I embraced the flinging goo. This stuff became like industrial strength boogers on my fingers that wouldn't come off! Anyway, with a little help from Debbie, I slowly laid the final layer down on the seat making sure it is spread evenly so I don't get any weird wrinkles anywhere. I let it dry a bit and then trim it up.
It looked a bit fat so I was concerned the seat cover wouldn't be able to reach everywhere so I could restaple it to the pan. However, this foam is VERY soft and crushes down easily at the edges. I got the cover back over the foam and then started the stretching process. I smoothed from the center out to the edges, making sure it was the same on opposite sides so that I would have the same amount of overlap for stapling on the underside of the pan.
My staple gun sucks. I threw down $10 bucks on a staple gun and I expect it to at least get the staples into the plastic :angryfir: Instead, it puts the staples in about half way, no matter how firmly I try to hold it against the surface. I wind up having to come behind with a flat head screw driver and carefully pushing each and every staple all the way down. My thumbs were killing me from pushing on the shaft of the screw driver. However, when I finally get it done, it looks pretty good. BMW had glued down the edges of the seat cover originally and I thought I was going to do likewise (and may yet), but for now, I am just going to leave it at the staples. I take it out the bike and mount it so I can repeat the butt test. It feels great!
Here's the final product.
I figure it can't be any worse than it was before and I only spent $15 :wink: Of course, I got the foam and glue free, hehe. I think that was about $50 when Debbie originally ordered it. I'll hopefully take it out for a spin tomorrow and will report back how it worked.
Adios,
")