I love that black CB1100F. Great job. 


-
 Welcome to the Two Wheeled Texans community!
  Feel free to hang out and lurk as long as you like. However, we would like to encourage you to register so that you can join the community and use the numerous features on the site. After registering, don't forget to post up an introduction!
You are using an out of date browser. It may not display this or other websites correctly.
You should upgrade or use an alternative browser.
You should upgrade or use an alternative browser.
New Dual Sport Project - 1974 XL350 K0
- Thread starter bmcdonau
- Start date
M
Mike in Clear Lake
Guest
This is one of the most admirable threads I have read 
My gosh!! That CB1100 is too cool for words.
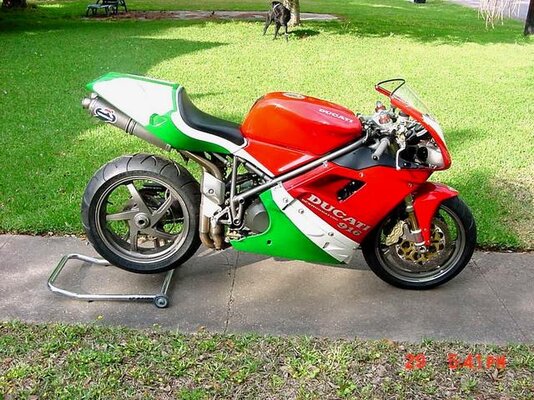
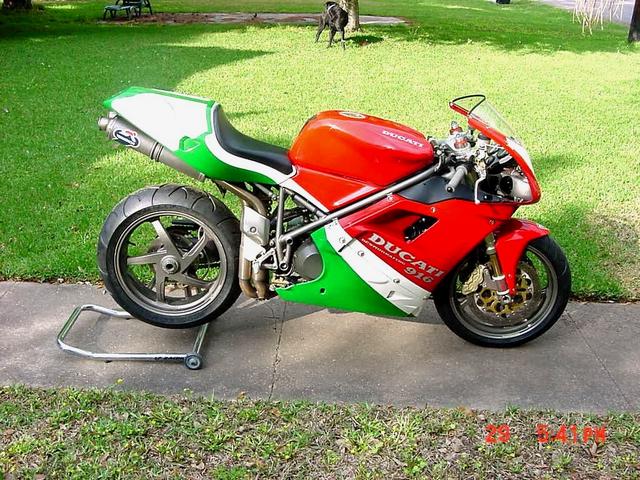
Thanks guys, that 1100F in black is a stunner. It came out even better than I had hoped. I sold it in September to a guy in Indiana and kept the stock one. I'm thinking of finding a set of bodywork on e-bay and doing it in black so I can switch back and forth.
Here's whats going on with the XL350.

The head after the valve job.

The barrell honed.
The stock piston and rings are on order, but CMS is closed until 2 Jan so it'll be awhile before I can put the engine back together.

The bottom of the case before.

The bottom of the case after stripping the paint and cleaning.

I should finish painting the engine and cases in a couple days.
Here's whats going on with the XL350.
The head after the valve job.
The barrell honed.
The stock piston and rings are on order, but CMS is closed until 2 Jan so it'll be awhile before I can put the engine back together.
The bottom of the case before.
The bottom of the case after stripping the paint and cleaning.
I should finish painting the engine and cases in a couple days.
Its going to take awhile before the piston and rings come in so I can finish up a lot of things in the meantime.

I got traded a NOS right switch to replace the wrong one I had.

I painted the blue on the tank, it came out pretty good, but I'm worried about getting the black stripe on straight and even.


I'm working on the side covers. I scrapped off the decals, then dry sanded with 100, 150 and 220. Next, I'll prime then sand with 220, 320, 400, 500, then 600 wet. Finally I'll shoot the black, sand it with 600, apply the decals then shoot it with a matt clear like the original finish.

The engine is painted as are the left side cases. I'll be working on the right side cases now, but I still waiting on a few seals I've ordered.

The timing cover.

The cylinder head. I should have told them to blast it when I had it honed, but I forgot. I cleaned it with steel wool, sandpaper, a scotch brite pad, and finally lots of Simple Green with rags and cue tips.
I'll be rebuilding the carb and installing the head light bucket and turn signals this week.
I got traded a NOS right switch to replace the wrong one I had.
I painted the blue on the tank, it came out pretty good, but I'm worried about getting the black stripe on straight and even.
I'm working on the side covers. I scrapped off the decals, then dry sanded with 100, 150 and 220. Next, I'll prime then sand with 220, 320, 400, 500, then 600 wet. Finally I'll shoot the black, sand it with 600, apply the decals then shoot it with a matt clear like the original finish.
The engine is painted as are the left side cases. I'll be working on the right side cases now, but I still waiting on a few seals I've ordered.
The timing cover.
The cylinder head. I should have told them to blast it when I had it honed, but I forgot. I cleaned it with steel wool, sandpaper, a scotch brite pad, and finally lots of Simple Green with rags and cue tips.
I'll be rebuilding the carb and installing the head light bucket and turn signals this week.
achesley
0
- Joined
- Feb 13, 2008
- Messages
- 4,685
- Reaction score
- 73
- Location
- Jennings,La.
- First Name
- Andy
- Last Name
- Chesley
Great work. I always called restoration a work of LOVE!
I screwed around with the stripe for an hour tonight and used about twenty feet of tape before I had something close to what I could live with.

This part wasn't hard--I just ran three pieces of tape and removed the center one.

This two inches was a PIA. I had a difficult time getting the gap between what will be the black stripe and the blue uniform AND the stripe a consistent width around this corner.

Now I just hope it looks good painted.
The right case was pretty beat up. First I used a grinding wheel to rough up the bad spots, I used JB weld to fill in a lot of scrapes, dings and scratches.


This part wasn't hard--I just ran three pieces of tape and removed the center one.
This two inches was a PIA. I had a difficult time getting the gap between what will be the black stripe and the blue uniform AND the stripe a consistent width around this corner.
Now I just hope it looks good painted.
The right case was pretty beat up. First I used a grinding wheel to rough up the bad spots, I used JB weld to fill in a lot of scrapes, dings and scratches.
owtcast
0

It's looking good! Very good indeed.
I can relate with you on making that turn with the tape. I had similar problems when painting the tail of my Ducati a few years back.

tape doesn't like to turn corners
Here's the pictures of the almost finished tank. I have to wait 48 hours before I can clear coat to give the decals time to gas out.
This tank was difficult to paint because it is not symmetrical. The left side is longer and lower than the right for the petcock and the gas cap is on the right side so it made it difficult to line up the stripes.
Paint tends to run up the masking tape when you two tone so you end up with a slight ridge along the boundary between the two colors. You can knock it down with some 600 grit and a sanding block. Because the gas cap is offset to one side I accidently sanded through the blue to the sliver next to the cap and had to touch it up with an airbrush. I'll be glad when this is finished!
M
Mike in Clear Lake
Guest
This dude is gifted!
T
Texfire
Guest
Wow. I'm just amazed to watch the skill this entails. It fans my latent desire to become a jack of all trades when I have the opportunity, time and money.
This is one of the coolest threads I have saw on TWT.
Thanks for 1-showing some love to an old bike 2-sharing it with us who admire the time and effort it takes to pull this off.
I also like your outlook on it, use what you can, improvise when necessary, and taking the time to do it right. About all I can say is that the ones I have talked to are enjoying the thread and you are building quite a fan base among those of us who just ride and do a little maintenance. Keep it up, we are having a blast watching you do this.
You guys are going to give me a big head . There's really nothing to doing this--most things I've learned to do, I did by just jumping in. There is a vast storehouse of information out there and with the internet its readily accessable. There's a forum for everything from specific bikes, to painting, electrical, and even engine rebuilding. I try not to delve into something until I'm sure how it works because I've screwed stuff up in the past by messing with things when I didn't know how they worked. I'd be more than happy to help anyone who wants restore an old bike.
Duke
0
- Joined
- Oct 7, 2005
- Messages
- 4,820
- Reaction score
- 269
- Location
- Saint Johns, FL (Woden, TX)
- First Name
- Duke
I'm only able to see some of the pics, in some of the posts all there is is script, then blanks where the pics should be. I know there is something I can do, but I can't remember where I read it here on TWT.


Not sure what the issue might be. I don't have a problem viewing any of the photos and all appear to be working properly.
Can you give a specific post # that is not showing pic for you?
For me this thread has been not only entertaining but inspirational. I have found myself search craigslist and ebay more and more for an old bike to tackle.
pkiser
0
- Joined
- Feb 12, 2006
- Messages
- 622
- Reaction score
- 5
- Location
- Huntsville, Texas
- First Name
- Philip
- Last Name
- Kiser
You guys are going to give me a big head
Somebody has to give you a big head about this. I'm sure your wife just sees it as something that is taking up room in her garage. Keep up the good work and thanks again for sharing it with us. I think we need to have a ride to eat when you finish and buy you lunch. Please bring the bike so we can all see it in person.
pk
Duke, it is sporadic, on this page I can see the pics in post 82, but not 85. On page 4, I see the pics only in post 61 and no others. On page three... I can see the first two pics on post 51... then nothing down to the OCC guys. Page 1 & 2 just as weird.
Last edited:
Duke, it is sporadic, on this page I can see the pics in post 82, but not 85. On page 4, I see the pics only in post 61 and no others. On page three... I can see the first two pics on post 51... then nothing down to the OCC guys. Page 1 & 2 just as weird.
I think you might be experiencing a browser/PC problem on your end.
Pacman, I pondered that, but I have no problems on any other thread, and I recall seeing that problem once before on another thread with other people posting about it. I think one of the admins posted a cure about refreshing or right clicking or something...I may have to post a question. Thanks
Duke
0
- Joined
- Oct 7, 2005
- Messages
- 4,820
- Reaction score
- 269
- Location
- Saint Johns, FL (Woden, TX)
- First Name
- Duke
Duke, it is sporadic, on this page I can see the pics in post 82, but not 85. On page 4, I see the pics only in post 61 and no others. On page three... I can see the first two pics on post 51... then nothing down to the OCC guys. Page 1 & 2 just as weird.
I think you might be experiencing a browser/PC problem on your end.
Pacman, I pondered that, but I have no problems on any other thread, and I recall seeing that problem once before on another thread with other people posting about it. I think one of the admins posted a cure about refreshing or right clicking or something...I may have to post a question. Thanks
Primate,
With what you shared I can not see a trend. All of bmcdonau's pictures are hosted on his photobucket site. You can see some, but not others, but they are all hosted at the same site????
I am thinking that maybe your pc is failing to load some photos after its memory is tasked or something. I DON'T KNOW.
What browser are you using?
Last edited:
 Thanks again for the input though.
I am cleaning and rebuilding the carb today.

The air cleaner is dirty and stained-I'll set it aside and clean it later.


The bike was running rich so besides cleaning the carb and replacing the rubber and brass parts, I'll lower the needle so it'll run a little leaner. You can see from the pictures the carb is caked in grease and stained by fuel.

I have a Keyster rebuild kit and Honda gasket kit.


Everybody has their own procedure, I always start by removing the float bowl.

Then I remove the float, float valve, slow jet, and needle jet. Some carbs don't have a slow jet and some call the needle jet the main jet. The float valve is usually what causes the carbs to leak when you turn the bike off. They can wear out or get dirt in between the mating surfaces. These parts all look worn out.

Next I start on the sides of the carb. This goes into what is called the slow air jet on this carb. The two rubber o-rings will be replaced with new ones.

The manual doesn't address this part, but it looks like the air cut off valve on later carbs that stop fuel from flowing when the engine is off and the petcock is left in the on position.

This is behind the previous photo. I replaced two o-rigns here.

The old and new air mixture screws.

The old and new float valve.

The new parts going together.


The carb back together and clean. I didn't have a new needle jet so I cleaned the one I had. There are five very small holes on either side of the jet and most were clogged with dirt and grime. I also replaced the needle and dropped the clip one position so lean out the mixture. I used WD40, Simple Green, and dish shoap to clean the carb and parts. I found a new carb boot in Europe, the last one in captivity as far as I know!
The air cleaner is dirty and stained-I'll set it aside and clean it later.
The bike was running rich so besides cleaning the carb and replacing the rubber and brass parts, I'll lower the needle so it'll run a little leaner. You can see from the pictures the carb is caked in grease and stained by fuel.
I have a Keyster rebuild kit and Honda gasket kit.
Everybody has their own procedure, I always start by removing the float bowl.
Then I remove the float, float valve, slow jet, and needle jet. Some carbs don't have a slow jet and some call the needle jet the main jet. The float valve is usually what causes the carbs to leak when you turn the bike off. They can wear out or get dirt in between the mating surfaces. These parts all look worn out.
Next I start on the sides of the carb. This goes into what is called the slow air jet on this carb. The two rubber o-rings will be replaced with new ones.
The manual doesn't address this part, but it looks like the air cut off valve on later carbs that stop fuel from flowing when the engine is off and the petcock is left in the on position.
This is behind the previous photo. I replaced two o-rigns here.
The old and new air mixture screws.
The old and new float valve.
The new parts going together.
The carb back together and clean. I didn't have a new needle jet so I cleaned the one I had. There are five very small holes on either side of the jet and most were clogged with dirt and grime. I also replaced the needle and dropped the clip one position so lean out the mixture. I used WD40, Simple Green, and dish shoap to clean the carb and parts. I found a new carb boot in Europe, the last one in captivity as far as I know!