Three of the down pipes fit just fine. I had a tuff time with the fourth, but was able to get it without too much work.


-
 Welcome to the Two Wheeled Texans community!
  Feel free to hang out and lurk as long as you like. However, we would like to encourage you to register so that you can join the community and use the numerous features on the site. After registering, don't forget to post up an introduction!
You are using an out of date browser. It may not display this or other websites correctly.
You should upgrade or use an alternative browser.
You should upgrade or use an alternative browser.
Delkevic Header 1250
- Thread starter Classypete
- Start date
Correct me if I am wrong but I think this is a pretty good O2 eliminator option and then you plug the hole. I plan to do this.
http://www.twtex.com/forums/showthread.php?t=63850
http://www.twtex.com/forums/showthread.php?t=63850
Y
ywgbandit
Guest
Three of the down pipes fit just fine. I had a tuff time with the fourth, but was able to get it without too much work.
Did you let them know? I don't understand why there would be any issues if they are using a jig or an actual engine. Both sets I sent back were the same...3 fit good and one was out a fair bit on the first set. In hindsight I should have just taken it to a muffler shop and had it bent slightly more. The second set they sent wasn't even close, so I just boxed them up and sent them back. Both times I took photo's of how the fit was and sent them to Delkevic. I think they should be told if their product doesn't fit 100%
where did you use the black stuff in a tube? how about anti-seize compound on the bolts?
Y
ywgbandit
Guest
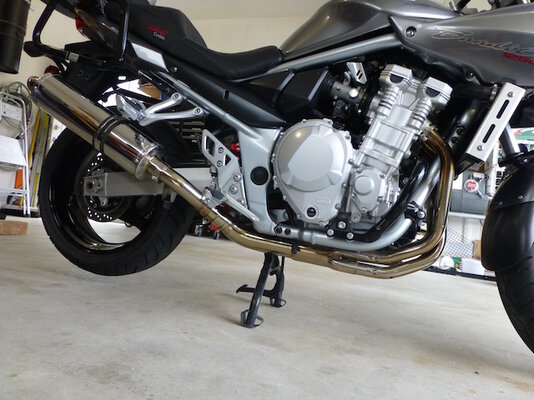
I finally got the headers mounted today. The problem was that during the manufacturing process of the collector pipe itself the inside of two of the pipes had broken welding wire stuck inside. It looks like the tubing was welded from the inside and a piece of welding wire was partially fused to the inside seam, but was broken and left a little tab inside. That stopped the down pipe from penetrating all the way in. I made up a bob by cutting a slot with a hacksaw in a 3/8" bolt length wise about 2" long. I then cut off the bolt head so I could put the bob into the drill chuck. I put the bob in a drill and used an old piece of course sanding belt and spun it in side each opening of the collector to remove all the burrs and wire. Then using the supplied high temp silicone (at least thats what I think it was because there were no instructions) I was able to slip the collector onto downpipes that I had loosely mounted in the exhaust ports. Then I beat on them with a hard rubber mallet until they were inserted all the way up to the lines I had marked on the downpipes, which indicated full penetration of the downpipes into the collector.
max1138
0
glad you got it done, that sort of thing takes a lot of patience and time to get right. ill have to remember to grab some small flapper wheels for the end grinder to deburr the tube ends if I ever order one of these.
Y
ywgbandit
Guest
It sure makes inserting the down pipes into the collector a lot easier with the inside of each port in the collector polished and deburred. The silicone also helps, because when I dry fit it I couldn't get the pipes all the way in, but figured they would go easier with the silicone...and they did. They actually look good once they are on.
Y
ywgbandit
Guest
The only rattle I had was the bolt that holds the removable baffle in the end of the muffler came loose and needed to be tightened. The springs that hold the down pipe sections into the collector hold them very firmly, can't see that rattling. They should be re-torqued at the heads after a couple of heat cycles to make sure the copper crush gaskets are properly sealed.
Any of you gents that have installed the Delkevic headers have any recent pics? How have the held up over time and did they change colors after broken in (which is fine). I have just seen brand new install pics.
Yellowish as in bad or as in yellowish gold?
Y
ywgbandit
Guest
Any of you gents that have installed the Delkevic headers have any recent pics? How have the held up over time and did they change colors after broken in (which is fine). I have just seen brand new install pics.
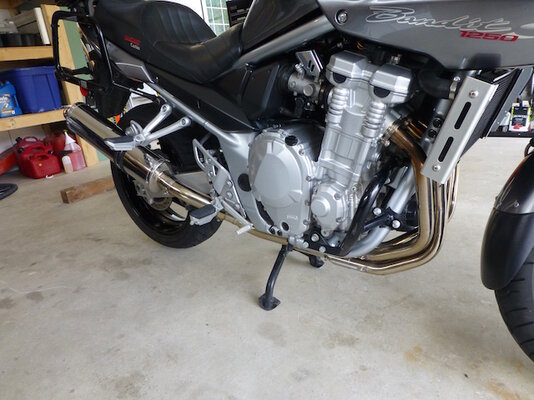
My Delkevic headers have 38,000 km (23,600 miles) and here's what they look like. They do develop a sort of gold patina and discolor close to the heads, but they are holding up well and they make a big difference in performance when combined with the Dobeck TFI.
Attachments


Last edited by a moderator:
Y
ywgbandit
Guest
You can polish most of the patina off with a good chrome type polish, but it's very hard to get it all, specially close to the heads behind the radiator. Personally I like the patina.
Thanks for the input. They look like they are holding up fine!
Zeronine
0
I am thinking of doing just these headers (already have a slip on) to save some weight. Hopefully there are no fitment issues now in 2017?
I did eventually install a set. Fitting them was tight by myself. If you can get an extra set of hands to help, it will be a breeze. Fit loosely, pull, push, tug, and tighten. No issues since install.
Super pleased with my BlackWidow downpipe. Absolutely perfect fit and finish.