• Welcome to the Two Wheeled Texans community! Feel free to hang out and lurk as long as you like. However, we would like to encourage you to register so that you can join the community and use the numerous features on the site. After registering, don't forget to post up an introduction!

HID Lighting

Joined
May 28, 2008
Messages
417
Reaction score
0
Location
Central Indiana
I installed (or I should say, am in the process of installing) HID kits for high and low beams. I used the DDM 55W HIDs (5000 lumens vs. 3200 for 35W HIDs) with 5k lamps. Man, these things are bright!!! :thumb:

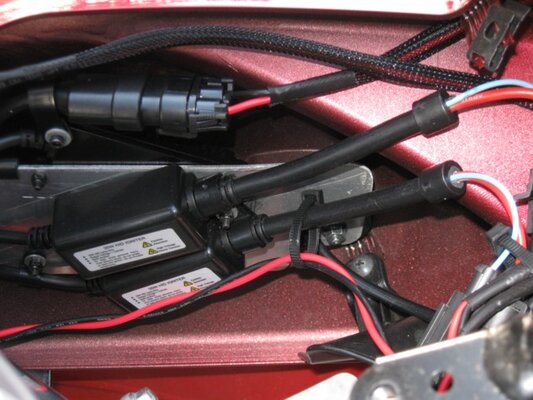
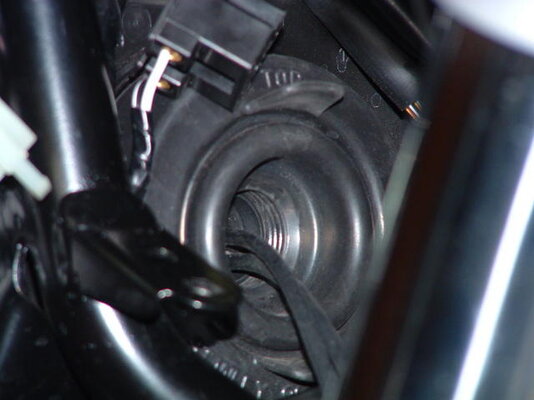
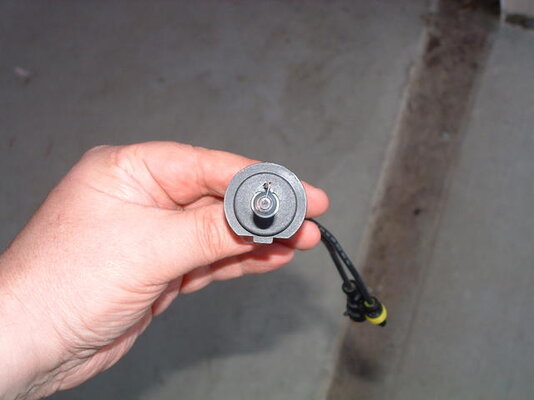
I haven't finished the install yet. Got the lamps in and rubber boots back on. Then, hooked everything up loose just to make sure the stock headlamp wiring would fire the ballasts OK - worked fine.

I haven't ridden the bike with the new HIDs yet, but they were much, much brighter in comparison the the 100W Hellas I had in. These HIDs are the lighting equivalent of a Stebel Nautilus in the horn world. The pattern looked fine and much like what I've seen others post where they are shining their HIDs against a garage door.

I am taking pics as I go and will post a full project write-up when I'm done.

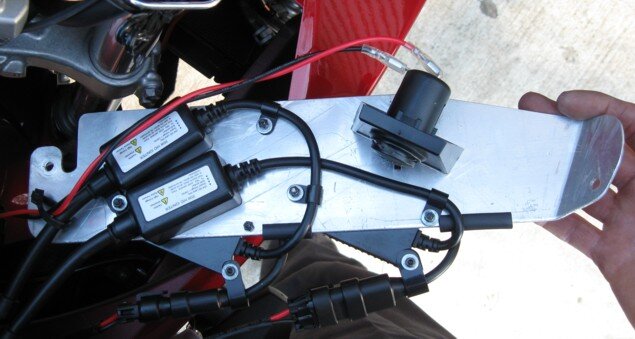
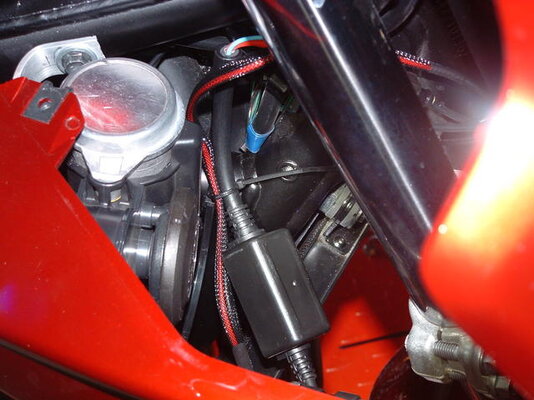
But, for those of you that have done the HIDs, how and where are you mounting your ballasts?? I was going to velcro mine to the inside of the fairing, but that will complicate pulling the fairing in the future with the wiring.
 
There is an unused bolt hole on each side of the frame above the valve cover. I believe it is used to hold the frame cover for the naked Euro bikes. The HID kit I used was supplied with a couple bolts that even fit.
I placed some 3/8 closed cell weather stripping on the back of the ballast bracket, bolted one end of the bracket into that hole and the other end was zip-tied to the frame. The weather stripping protects the frame from damage and provides a cushion to help with tension on the zip tie. Others have used epoxy to bond it to the inside of the fairing but that could be an issue if there was ever a need to change the ballast.
 
I epoxied the metal brackets the ballasts attach to , to the inside of the fairing. If a ballast goes bad all I have to do is pop it out of the bracket and put in a new one. I am at work right now but will post up pics when i get home tonight.
 
Indy,

I saw where you asked this question in the max-zuk forum and referred to a post that I had made there http://www.maximum-suzuki.com/forums/index.php?topic=70743.0. I'll answer you here since I am more familiar with the picture posting procedure at this site.

My soulution may be more trouble than you care to do, but since you asked, I'll tell you what I did. Maybe it will give you some ideas to add to some of the other good ideas that are being posted here.

I made a bracket out of .062 sheet aluminum (.050 would be fine also) that attaches on one end to the turn signal mounting stud (1st picture) and the other end mounts to the EVAP purge control valve mounting stud (2nd picture).

I mounted both ballasts on the outside of this bracket next to the fairing (3rd picture) and mounted both igniters on the inside of the bracket towards the forks (4th picture). The ballasts and igniters were mounted so that all wires were not in a bind and the connectors were accesable.

The 5th picture is a shot of the assembly mounted on the bike. This is looking straight down from the area above the left fairing. You'll also notice that I had enough room to mount a 12V accessory plug.

If you decide to do something similar to this, I'd suggest making the bracket and then use double sided foam tape to hold all parts in place for trial fit purposes. When you have everything situated, you can then dril your mounting holes.

This was one of my winter-time projects so time wasn't a major concern. It also helped that this is very much like what I do for a living as a tool & die maker.

Hope this helps.
 

Attachments

  • HID Bracket 5.JPG
    HID Bracket 5.JPG
    84.2 KB · Views: 394
  • HID Bracket 7.jpg
    HID Bracket 7.jpg
    25 KB · Views: 374
  • HID Bracket 3.JPG
    HID Bracket 3.JPG
    50.7 KB · Views: 400
  • HID Bracket 1.JPG
    HID Bracket 1.JPG
    57.2 KB · Views: 383
  • HID Bracket 8.JPG
    HID Bracket 8.JPG
    84.5 KB · Views: 385
I epoxied the metal brackets the ballasts attach to , to the inside of the fairing. If a ballast goes bad all I have to do is pop it out of the bracket and put in a new one. I am at work right now but will post up pics when i get home tonight.

Sorry, it's been a while since I read the posting. Having just the bracket glued in is a qwick, easy and effective way of doing it.
 
TM91,

That's an excellent mounting scheme you have. Not sure I'm capable of something quite like that, but you have given me some thoughts on other possible solutions that I'll look at now. Did you maintain the original lighting sockets and just slide the spade connectors into them??

Nice post.
 
I got the bike out for a ride tonite - put the ballasts in the tank bag until I finalize my mounting scheme. Wow, what a difference these lights make. I had to adjust my beams down slightly, but the Bandit has a pretty nice cutoff on the pattern which makes these HIDs on-coming driver friendly. When I got the adjustment right, with both beams on, I could see a long way and the sides of the road were lit up very well. Can't express how good it is to have this kinda light to ride with.

One quick tip on the DDM kit: keep the plastic case the HID lamps come in. They make great containers for your standard bulbs for carrying as spares. If you keep the stock lighting sockets in the new wiring scheme, you can quickly unplug the HID setup and reinstall a halogen as a backup plan.
 
TM91,

Did you maintain the original lighting sockets and just slide the spade connectors into them??

Yes. I always try to make my modifications completely reversable. This is something that becomes a habit if you own a Corvette. I like to be able to go back to the original stock condition for resale purposes.
 
I installed (or I should say, am in the process of installing) HID kits for high and low beams. I used the DDM 55W HIDs (5000 lumens vs. 3200 for 35W HIDs) with 5k lamps. Man, these things are bright!!! :thumb:

I'm thinking about buying the same kit. the Bandit uses a H7 bulb correct?
 
I'm sure I missed it, but where do you get these kits, who makes them, what do they cost, etc, etc. I think I see this kit at ddmtuning.com for about $115 complete for both bulbs and everything I need. Sound right?

Phil
 
I'm sure I missed it, but where do you get these kits, who makes them, what do they cost, etc, etc. I think I see this kit at ddmtuning.com for about $115 complete for both bulbs and everything I need. Sound right?

Phil

Yep ddmtuning.com. Just checked the site, and the h7 dual 55W kits are $85.

Phil, you'll love these lights. I got mine in with the 5000k lamps. Like them. Might try the 6000k if I did it again, but it's minor. These things are wicked bright. The only issue is the on delay for the high beam. You've got about a 2 second delay before the lamp gets bright and about 5 seconds to full bright. I don't find it an issue though. The other challenge is dealing with the mounting. I found a spot in the front of the fairing where the ballasts can lay flat and velcro to the flat spot in the fairing nose. Then the wiring and ignitors can be tie-wrapped to the frame and it fits nicely. Others have posted mountings in here also. I'll get pics out once I get it all put back together (hopefully will be getting the butterflies out this weekend so I can get the stage 2 project done)
 
OK finished my stage 2 w/header and my HID mod.

I kept it pretty simple with the HIDs. I velcroed the ballasts inside the fairing nose. There is a flat (horizontal) area in front of the turnsignals where the ballasts can lay. I just velcroed them there and then routed the cables between the fork leg and the frame and tie-wrapped the cables to the frame. This suspended the ignitor and cabling so that it is not contacting anything. The lights work great. One of the best mods available IMO.

A couple of things for the DDM kit. Cut away the rubber piece holding the wiring together. Use side cuts to trim the base of the HID lamp to be round and fit within the plastic base.

I found it necessary to bend the spade connectors that connect inside the stock wiring socket. If left flat they tend to slide out pretty easily.

Here are a few pics.
 

Attachments

  • DSCF0023.jpg
    DSCF0023.jpg
    36.1 KB · Views: 371
  • DSCF0021.jpg
    DSCF0021.jpg
    31.8 KB · Views: 369
  • DSCF0020.jpg
    DSCF0020.jpg
    37.5 KB · Views: 381
  • DSCF0012.jpg
    DSCF0012.jpg
    42.8 KB · Views: 390
  • DSCF0004.jpg
    DSCF0004.jpg
    23.2 KB · Views: 359
A few more pics. From the post above, just a mention about the lamp protectors that come with the HID kit - they make a great holder for a halogen backup lamp. If your HID goes out just insert halogen and reconnect wiring as stock.
 

Attachments

  • DSCF0007.jpg
    DSCF0007.jpg
    44.9 KB · Views: 330
  • DSCF0008.jpg
    DSCF0008.jpg
    48.5 KB · Views: 330
  • DSCF0009.jpg
    DSCF0009.jpg
    42.4 KB · Views: 321
  • DSCF0010.jpg
    DSCF0010.jpg
    53 KB · Views: 328
I wouldn't mind some brighter light output, but I've decided that I'll address that with a simple bulb upgrade. Rather.... it's the limited pattern of the light as projected via the Bandit's reflector, that I object to. I don't like the way it does such a splendid job of cutting the light COMPLETELY off at the edges of the beam.... Freeway on/off ramps are a big problem, as there is absolutely NO LIGHT bleeding over from the headlamp to light up the road as it curves around.

I've decided that mounting additional lamps to supplement the headlight is the only way to get improved light to precede the bike.

(Got a screen? http://www.twtex.com/forums/showthread.php?p=595880#post595880 )

I would agree. That's why I am going to do both. I plan on adding some aux lights up front also. But, I gotta tell you these 55W HIDs will make a fantastic improvement by themselves. Under all but cornering lighting they are a huge improvement and light the side of the road well. For the money, it's worth it. Do a simple install like mine. It doesn't take long to put it in (now that I know how) and it is awesome. The aux lights will fill any hole that you might have.
 
Well I just installed a HID kit on my 1250. All I can say is its one of the best things you can do. I thought the lighting on the bandit was lacking from the factory. If you think that too. This is something I recomend doing. Also is there anything I can do about the headlight turning of when starting the bike? Seems like it may be hard on the HID ballast turning on when you turn your key on then turning off when you start the bike? Just wondering maybe its nothing to worry about?
 
Well I just installed a HID kit on my 1250. All I can say is its one of the best things you can do. I thought the lighting on the bandit was lacking from the factory. If you think that too. This is something I recomend doing. Also is there anything I can do about the headlight turning of when starting the bike? Seems like it may be hard on the HID ballast turning on when you turn your key on then turning off when you start the bike? Just wondering maybe its nothing to worry about?

That is something you'll want to take care of. Double-firing the HIDs like that dramatically reduces their lifespan from what I've read.

What I did was run power to the ballasts off a relay that was triggered using the little corner lamps that don't turn off when the starter is engaged. I actually ran mine through a switch on the dash too, but that's not necessary unless you just want to be able to switch them off sometimes (useful while tinkering in the garage, etc).

I'm not sure how the stock wiring would hold up with the intense power draw the HIDs require while warming up either...

trey
 
I left mine as is. I guess I'll see how long they last. With the ballasts all being solid state, I don't think the stress would be that great. The current draw on the wiring would be interesting to put a DC current loop on and see how it ramps. There again I don't think the short term ramp-up (? 3 or 4 sec or so ?) is long enough to create much stress on either the wire or the ballast. I held the ballast in my hand for a minute or so after firing it up when I was doing the install and it got slightly warm, but that's it.

I'm not too concerned. Time will tell. It might be that I'll be buying new ballasts every riding season too :loco:
 
I don't think it's supposed to be hard on the ballasts, it's the bulbs. The gasses inside the bulbs have a limited number of ignition cycles.

That said, I haven't done very much research on it myself. That's just what I was told back when I installed my first kit and I've always assumed there was some truth to it.

trey
 
Back
Top