• Welcome to the Two Wheeled Texans community! Feel free to hang out and lurk as long as you like. However, we would like to encourage you to register so that you can join the community and use the numerous features on the site. After registering, don't forget to post up an introduction!

I drank the kool-aid... The v-Strom kool-aid.

OK, so, quick update....


Steering bearing - done
Fork seals - done
Radiator guard - check
New brakes, front and back - done
Spacers from Adventure tech - done
Wired up a power point - done
New rear wheel bearings - done

If it is up to date on regular maintenance items, all you have to do now is ride!
 
So, I rode to drill on the first weekend of the month. Battery dead, blah blah blah. Start researching, replace the stator.... NOPE!

Loose magnets.

So. What to do? Well, here's what to do.

eneme7ar.jpg


First, pout a little bit. Those magnets should be evenly spaced all the way round.

Then, start fixing.

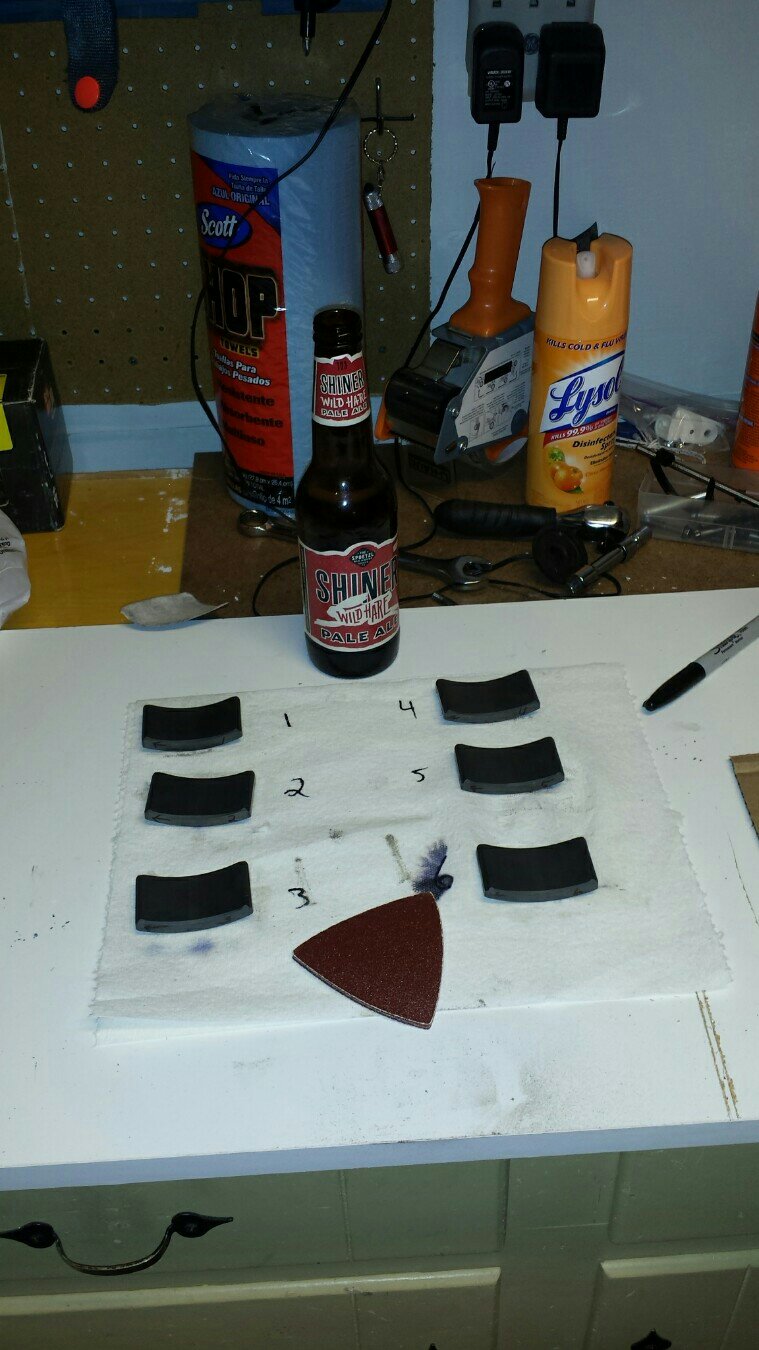
So, all six of mine were loose. The epoxy just wasn't stuck to the flywheel at all. Take them out, labeling them as you go.

erugeryg.jpg

The arrow is clockwise, and I numbered them. I don't think it matters what order they go in, but whatever.

Clean off all the oil and junk with the contact cleaner. Do not use brake cleaner. Use electrical contact cleaner. It WILL dissolve sharpie. As you pick each one up to clean it, you need to be sure to replace the marking if it comes off. Keep an eye on what side you marked.

epyqy7e9.jpg


Sand all the epoxy off. I used a Dremel. When you disregard my advice about paying attention to the orientation of the magnets, don't worry. To check which way it goes, put a finger on the other magnets (one at a time) and lower the unknown magnet onto it. They will attract if they are in the right orientation.
 
nasunusy.jpg


There, all clean. And you can see what the cleaner does to sharpie!

Clean the flywheel. Like I said, I got lucky in that there was zero epoxy stuck to my flywheel. I've read other stories online that sound just awful. Anyway, clean that with the electrical cleaner, too.

me4atagu.jpg


Now, if you're following my example to the letter, you will have to stop working for a while to go pick up your kids from school. If you don't have kids, borrow some. You can have mine if you promise not to bring them back. (I keeeed, I keeeeed!)

Next installment, JB Weld! Yes, that stuff. Apparently the original formula is impervious to just about every petroleum product known, but certainly is unaffected by oil, or heat up to 500°F. If my engine hits 500°F, I get the feeling I'll be worried about more than whether or not the JB will hold.
 
waiting for it to cure? What are the results?

Well, I'm waiting on four of them to cure, lol.
uga7ugyq.jpg


I didn't account for the tight space at the top of the flywheel, and none of my clamps would fit! So, I did four, they look good. Tonight I'm gonna turn the flywheel 180° and do the last two. Which is fine, as the small parts I ordered from motosport won't be in until Monday.
epu2ypeh.jpg


Just be sure you've got all your materials before you start. ;)
4yputese.jpg
 
Good. Experience?

Yes, did them with my stator last year. 10k and no problems so far. The strength of the magnets really makes the clamps unnecessary. I just went really clean and really thin with the jb
 
Yes, did them with my stator last year. 10k and no problems so far. The strength of the magnets really makes the clamps unnecessary. I just went really clean and really thin with the jb

I figured that, but wanted to be sure I really got the magnets snugged down tight.
 
I messed it up. I don't wanna talk about it right now, but I messed it up.
 
So, I did four magnets the other night, then went to do the last two last night. I dropped one of the magnets, and it just happened to fall toward one of the magnets I already installed, and it moved around a little, then stuck. I looked at HOW it stuck and thought "oh, $&#@"

Sure enough, after checking it out three times to be sure, I had epoxied one of them in backwards.

Recovery failed, replacement ordered.


Sigh.
 
Yes, did them with my stator last year. 10k and no problems so far. The strength of the magnets really makes the clamps unnecessary. I just went really clean and really thin with the jb

I figured that, but wanted to be sure I really got the magnets snugged down tight.

In hindsight stealthcrf's method eliminates a potential mishap. If you didn't use the clamps you would have discovered your error before the JB Weld cured.

_
 
In hindsight stealthcrf's method eliminates a potential mishap. If you didn't use the clamps you would have discovered your error before the JB Weld cured.

_

Yup.

Edit:
Actually, i may not have discovered it at all until I had it buttoned up. No guarantee I'd have dropped one. *shrug*
 
Welcome back my friends to the show that never ends
We're so glad you could attend
Come inside! Come inside! - ELP

It's time again to open up the Strom!

Inspired by Pacific Coaster, I think I'll keep a blog!

So, I've got a minor oil leak, I think. More investigation is necessary.

It's time for a valve lash check.

I need to do a TBS.

I need to reinstall some accessories.

Since I'm gonna drain the oil and coolant, I'm gonna check the magneto and spark plugs.

I ordered new rubber for the driver pegs.

If there's money left over, I'm gonna order a werks clutch basket, maybe.

The bike WAS for sale, but I decided not to sell it. Then, literally two hours after I parked it the day I made that decision, I saw an oil drip. So, I'm actually glad it didn't sell, because I do NOT want to be the guy who sells you a bike that immediately starts leaking oil.
 
So, then, first step is to get her naked!

d6beea70f3ed1629891263ac1eca4a82.jpg


And then clean the garage! Ha!
 
I am familiar with the PC800 thread - yours is 100% more difficult to post to cause the work is so complex! I am afraid to offer anything I have learned on my vintage bikes but I'll try - is the oil leak just a seal? The bike is 10 years old so any rubber seal might be suspect.

That picture with the clamps on the JB and magnets, is the front sprocket missing a few teeth or is it an optical illusion?
 
Last edited:
Where did the drip come from? How many miles are on it?

Depending on your answers, I'd be willing to bet that it is either the shift shaft, countershaft seal, or clutch pushrod seal; with most of my money going towards the latter two. The good news is that all of those are pretty easy to swap out.

I forgot to add, depending on mileage it would probably be a good time to start thinking about steering stem bearings. Good news, they are fairly easy to swap as well. Not quite a easy as the seals, but still pretty simple.
 
Last edited:
I am familiar with the PC800 thread - yours is 100% more difficult to post to cause the work is so complex! I am afraid to offer anything I have learned on my vintage bikes but I'll try - is the oil leak just a seal? The bike is 10 years old so any rubber seal might be suspect.

That picture with the clamps on the JB and magnets, is the front sprocket missing a few teeth or is it an optical illusion?
Illusion. It probably needs replaced by now, though. That was a while ago.
 
Where did the drip come from? How many miles are on it?

Depending on your answers, I'd be willing to bet that it is either the shift shaft, countershaft seal, or clutch pushrod seal; with most of my money going towards the latter two. The good news is that all of those are pretty easy to swap out.

I forgot to add, depending on mileage it would probably be a good time to start thinking about steering stem bearings. Good news, they are fairly easy to swap as well. Not quite a easy as the seals, but still pretty simple.
Around forty thousand miles. I'm betting it's one or more of those three seals.

The stem bearings were done last year along with the fork seals. :)
 
Step two: Clean the garage. No pics, I'm not done, lol.

Next we need to remove the tank.

d0f45990d00bcab893616530deeb8c90.jpg


Bonus points if you try to teach your kids stuff about motorcycles, but all they want to do is look at the bug crawling on the floor.
 
Remove bolts, disconnect fuel line and power for the pump.

Don't forget this drain hose, or you will be surprised by a sudden tug on your (unfortunately) full gas tank and think for a moment you are about to drop it on the floor.

ffb8a3cb9c0e87e1364f389db080c158.jpg
 
Back
Top